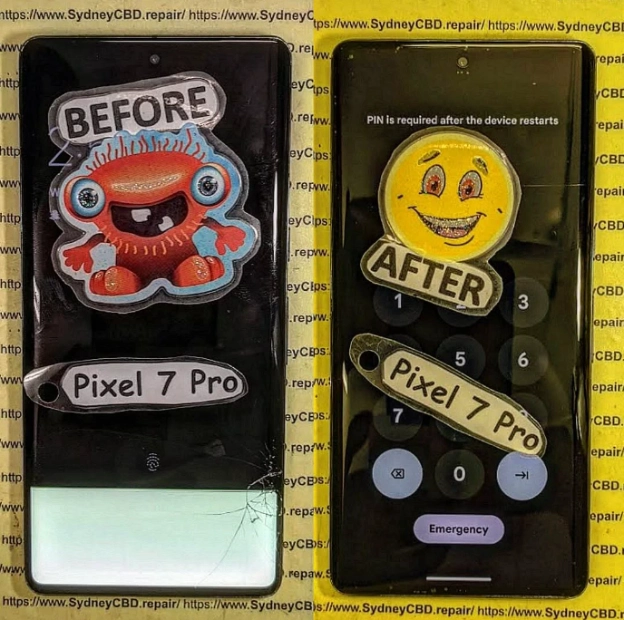
5 Tips for Pixel 7 Pro Camera Outer Glass Replacement
-
Introduction
-
Tip 1: Gather the necessary tools
-
Tip 2: Prepare the work area
-
Tip 3: Remove the damaged glass
-
Tip 4: Install the new glass
-
Tip 5: Test the camera
-
Conclusion
Introduction
If you're an owner of the Pixel 7 Pro, you know how important the camera is to capturing memories and moments in stunning detail. However, accidents happen, and if the outer glass of your Pixel 7 Pro camera has been damaged, you may be wondering how to go about replacing it. In this blog post, we will provide you with 5 tips for safely and effectively replacing the outer glass of your Pixel 7 Pro camera. Whether you're a DIY enthusiast or looking to save some money on repairs, these tips will help you navigate the process with confidence. From gathering the necessary tools to following step-by-step instructions, we've got you covered. With the right guidance and a steady hand, you'll have your Pixel 7 Pro camera looking as good as new in no time. So, if you're ready to take on the challenge of replacing the outer glass of your Pixel 7 Pro camera, read on for our expert tips and advice. Don't let a cracked or shattered outer glass ruin your photography experience – follow our tips and get back to capturing crystal-clear images with your Pixel 7 Pro camera.
Tip 1: Gather the necessary tools
Before attempting to replace the outer glass on your Pixel 7 Pro camera, it is crucial to gather all the necessary tools to ensure a successful repair. Some of the essential tools you will need include a precision screwdriver set, a heat gun or hairdryer, a suction cup, a plastic spudger or opening tool, a replacement outer glass panel, and adhesive strips or glue. These tools will help you safely and effectively remove the damaged glass and install the new one without causing any further damage to your device. It is important to have all the tools ready before starting the repair process to avoid any unnecessary delays or complications.
Having the right tools for the job will not only make the replacement process easier but also increase the chances of a successful repair. Make sure to double-check that you have all the tools listed before beginning the repair, as missing even one tool can significantly hinder your progress. Additionally, it is recommended to work in a well-lit and clean workspace to prevent any dust or debris from getting inside your device during the repair. By following this tip and gathering all the necessary tools beforehand, you will be well-equipped to tackle the challenge of replacing the outer glass on your Pixel 7 Pro camera.
Tip 2: Prepare the work area
When it comes to replacing the outer glass on your Pixel 7 Pro camera, preparation is key. Before you even think about getting started, take the time to set up a clean and organized work area. Make sure you have all the necessary tools and materials within reach, including a replacement glass panel, a heat gun or hairdryer, a suction cup, a pry tool, and adhesive. Clear off a large, well-lit workspace where you can spread out your tools and work comfortably without any distractions. It's also a good idea to lay down a soft, clean cloth to protect the camera and prevent any small parts from rolling away. Additionally, consider wearing gloves to protect your hands from any sharp edges or adhesives. By taking the time to properly prepare your work area, you'll save yourself a lot of time and frustration in the long run. Plus, you'll reduce the risk of damaging your camera or losing any important components during the replacement process. So, before you dive into replacing the outer glass on your Pixel 7 Pro camera, make sure you have everything you need and that your work area is set up for success.
Tip 3: Remove the damaged glass
When it comes to replacing the outer glass on your Pixel 7 Pro camera, it's important to first remove the damaged glass carefully. This step is crucial in order to ensure that the new glass fits properly and functions correctly. Start by gently prying off the damaged glass using a small tool, such as a screwdriver or knife. Be sure to work slowly and methodically to prevent any further damage to the camera. Once the damaged glass is removed, take the time to clean the area thoroughly to remove any debris or residue that may be left behind. This will help ensure a smooth and seamless installation of the new glass.
Removing the damaged glass can be a delicate process, but with the right tools and technique, it can be done effectively. Take your time and be patient, as rushing through this step can lead to further damage to your camera. Remember to handle the glass with care, as it can be sharp and fragile. Once the damaged glass is removed and the area is cleaned, you can move on to the next steps of replacing the outer glass on your Pixel 7 Pro camera. By following this tip, you'll be well on your way to a successful and professional-looking glass replacement.
Tip 4: Install the new glass
When it comes to replacing the outer glass on your Pixel 7 Pro camera, one of the most important steps is installing the new glass correctly. After removing the old glass, make sure to thoroughly clean the area where the new glass will be placed to ensure a secure fit. Carefully line up the new glass with the camera lens and gently press it into place, making sure it is properly aligned. Take your time during this step to avoid any potential damage to the camera lens or surrounding components. Once the new glass is in place, double-check to ensure it is securely attached and free of any dust or debris that could impact the quality of your photos. Remember, proper installation of the new glass is crucial for maintaining the functionality and appearance of your Pixel 7 Pro camera, so take your time and follow these steps carefully to ensure a successful replacement.
Tip 5: Test the camera
When it comes to replacing the outer glass on your Pixel 7 Pro camera, it's important to test the camera before completing the repair. This step is crucial in ensuring that the replacement glass has been properly installed and that the camera is functioning as it should. Testing the camera allows you to check for any potential issues such as blurry images, focus problems, or any other abnormalities that may have occurred during the repair process. By testing the camera, you can troubleshoot any problems that arise and make any necessary adjustments before finalizing the repair. Additionally, testing the camera will give you peace of mind knowing that your Pixel 7 Pro camera is in good working condition and ready to capture all of life's memorable moments.
One way to test the camera is by taking a few test shots in different lighting conditions to ensure that the images are clear and sharp. You can also test the camera's autofocus and zoom functions to make sure they are working properly. If you notice any issues during testing, you may need to re-evaluate the installation of the outer glass or seek professional assistance to address any underlying problems. By taking the time to thoroughly test the camera after replacing the outer glass, you can ensure that your Pixel 7 Pro camera is performing at its best and ready for all of your photography needs.
Conclusion
In conclusion, replacing the outer glass on your Pixel 7 Pro camera can be a daunting task, but with the right tools and techniques, it is definitely doable. By following the 5 tips outlined in this blog post, you can ensure a successful replacement process and have your camera looking as good as new in no time. Remember to take your time, work carefully, and always use the proper tools to avoid damaging your device. Whether you are an experienced DIYer or a novice, these tips can help you navigate the process with ease. Additionally, don't hesitate to seek professional help if you encounter any difficulties or feel unsure about completing the replacement on your own. With the right approach and a little bit of patience, you can successfully replace the outer glass on your Pixel 7 Pro camera and continue capturing stunning photos and videos with your device. So, go ahead and give it a try – you'll be amazed at the results!

☎️Phone: 0280114119
📲Mobile: 0437774119
📧Email: ask+pixel@SydneyCBDrepairCentre.com.au
⭕Business Hours: Mon-Fri 10am-6pm, Sat 10am-2pm, Sun-close
💬Live Chat: Click Here to 💬Chat Live With Us!
↗️📬POST: PO Box K652, Haymarket , NSW, 1240
🏢Visit: 📍 Suite 201, Level 2, 661 George Street, Haymarket, NSW, 2000 Australia
-
Introduction
-
Tip 1: Gather the necessary tools
-
Tip 2: Prepare the work area
-
Tip 3: Remove the damaged glass
-
Tip 4: Install the new glass
-
Tip 5: Test the camera
-
Conclusion